The Scorch Marker was given to me for this post. All opinions are my own because I love giving you helpful tutorials!
Create beautiful wood burning art with the Scorch Marker and a heat gun! A step by step tutorial for wood burning the easy way!

Isn’t the look of burned wood so pretty in home decor? I love it!
I recently tried to teach myself the art of wood-burning and it is a lot harder than it looks! While I’m not giving up, I have found a simple way to get the look of wood-burning without the skill, and that is my kind of crafting!
All you need is a Scorch Marker, a heat gun!

What is a Scorch Marker?
The Scorch Marker is a chemical wood burning marker, that allows you to color, draw, and/or trace onto a wood surface. Instead of using a soldering wood burning tool, simply heat the ink with a heat gun and your design is “burned” into your wood! How cool is that?!

A Wood Burned Sign using the Scorch Marker
Today I am going to share a step by step tutorial on a sign I made using the Scorch Marker. I made a vinyl stencil using my Cricut that I then traced onto my wood sign.
Supplies Used to Make aWood Burned Sign
Items linked below may go to similar items when exact items couldn’t be found online. Links are affiliate so when you purchase, I will get a small kickback to help fund the next tutorial!
- Scorch Marker
- Wood Sign 10 x 13 inches
- Heat Gun
- Wake Up and Repeat Design – Cricut Design Space
- Cricut Cutting Machine (I used a Cricut Maker)
- LightGrip Mat
- Vinyl
- Cricut BrightPad (optional)
- Vinyl Weeding Tools
- Scraper Tool
- Transfer Tape
- 220 Grit Sandpaper
Wood Burned Sign Video Tutorial
Like videos? I do have a video tutorial if you would prefer to watch the tutorial. Please subscribe to my YouTube Channel so you don’t miss out on any future video tutorials!
Making the Vinyl Stencil
I created the stencil for my sign in Cricut Design Space. You can use mine if you like! Simply click on the image below.

If you want to create your own so it is more personalized to you, you totally can. Just make sure that you measure your sign first so you know how big to make the design.

Once your design is how you like it, click the green “Make It” button in Design Space and it will be sent to your Cricut machine.
I cut mine using a Cricut Maker, but all Cricut machines can cut vinyl. With the Maker I select the type of material I am cutting within the design space program. With other Cricut machines like the Cricut Explore you set a dial to the material type.

Then let the Cricut do it’s thing! It is kinda fun to watch!

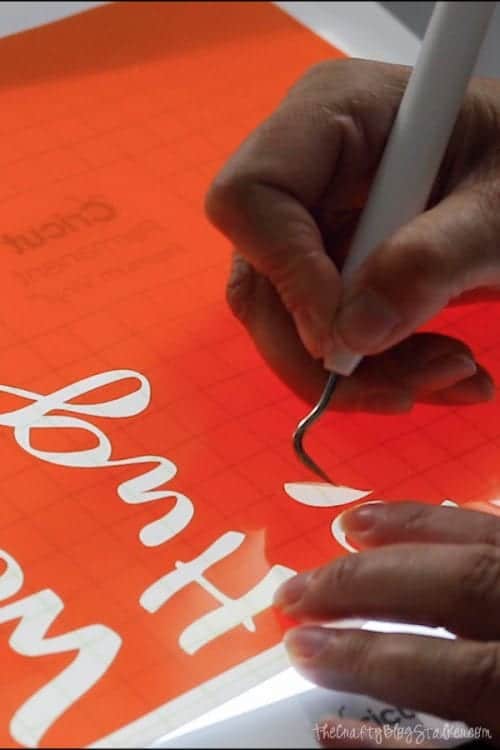
After the design is cut, remove the vinyl from the cutting mat and begin weeding. Since we are making a stencil we want to keep the negative part of the design. That means I remove the letters and keep the center part of the letters and the area around the letters.
I like to weed on my Cricut Bright Pad. The light shines through the cut lines so I can easily see where I need to weed, but you can still weed your vinyl without one.
Applying the Vinyl Stencil to the Wood
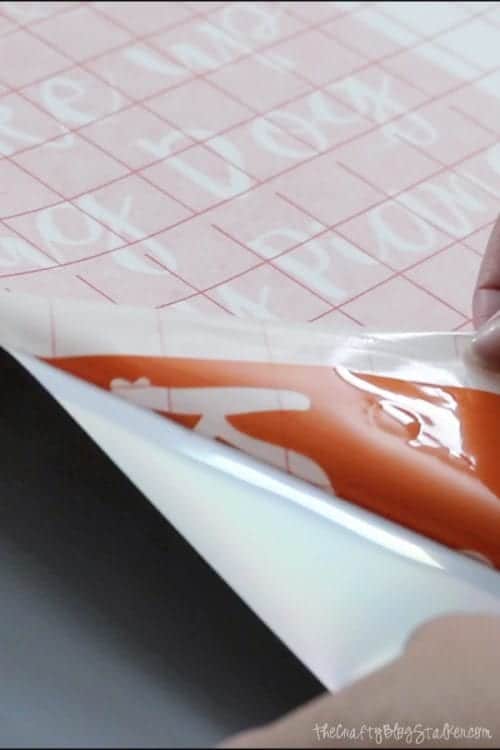
The easiest way to apply the stencil to the wood is to use transfer tape. Transfer tape is a carrier sheet for the vinyl sticker so it doesn’t get stretched while moving it to the wood.
Remove the paper backing of the transfer tape and lay it over the top of the vinyl stencil. Using a scraper tool, rub over the entire design to make sure the transfer tape is stuck nicely to the vinyl.
Carefully peel up the vinyl stencil with the transfer tape, removing it from the vinyl backing sheet. If little parts aren’t sticking to the transfer tape you can go over them again with the scraper tool or try turning the vinyl right side down and peel from the backing sheet side.
I prefer to eyeball the placement on my project, but if you would like you can measure and mark with a pencil to get the perfect placement.
Roll the stencil and transfer tape on the wood from top to bottom to avoid air bubbles.

Go over the top with the scraper tool to remove any air bubbles and make sure the vinyl is nice and stuck to the wood.
Then peel the transfer tape away from the wood sign, leaving the stencil stuck to the wood sign.

Coloring with the Scorch Marker
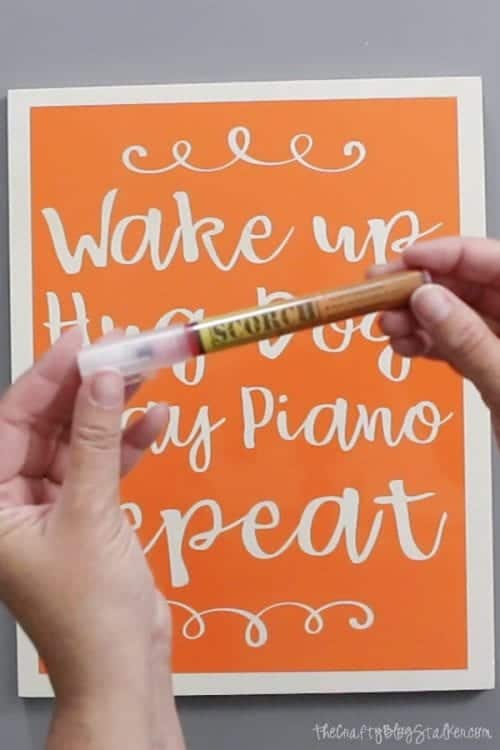
Now, simply color in the stencil with the Scorch Marker. You really don’t need a lot of ink. A little goes a long way. When my design was finished I could see where I used too much ink and wished I would have gone with a lighter hand.

It is OK if the ink is wet or dry when you use the heat gun. So don’t worry, there is no need to rush the coloring. You can take your time.
When the stencil is colored in, remove the vinyl stencil. You will be able to see a faint pink ink where you colored in the design.

Wood Burning with a Heat Gun
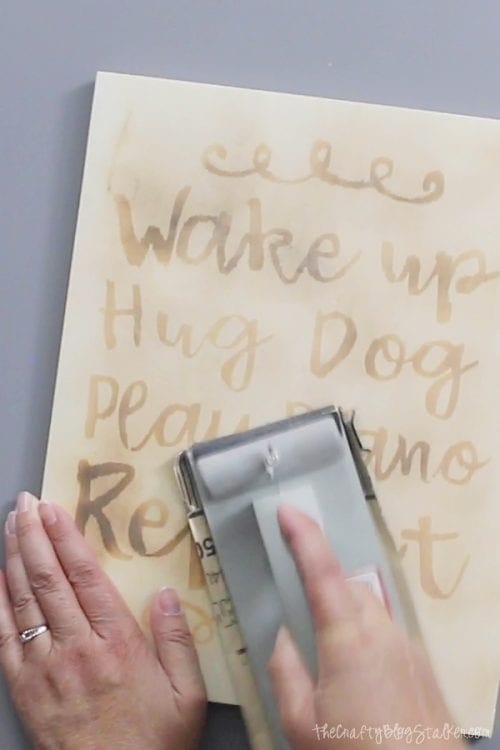
My heat gun goes up to 1020 degrees Fahrenheit. I turned it up all the way and began wood burning my sign.

You do want to be careful not to get the tip of the heat gun too close to the wood surface because you can burn the wood with the tip and it may not be an intended part of the design.
In fact, once my design was burned, I went around the edge of my sign to give it more of a universal burned look so the sides matched the middle.

As an extra step, I lightly sanded the finished sign to help those burned areas to blend a little bit more.
I love the finished look and I didn’t even touch a wood burning soldering tool!

What would your sign say? Would you keep it the same or have it say something completely different? Share and leave a comment below.
CLICK HERE TO SAVE HOW TO USE A SCORCH MARKER FOR YOUR WOOD BURNING SIGNS TO YOUR FAVORITE PINTEREST BOARDS!
Follow me on Pinterest and you can see all the DIY projects I’m pinning!
You Might Also Like These Tutorials:
- Wood Burning Cork Coasters
- Painted Cork Boards – Crafts for Kids
- Modern Front Door Decor Hanger
- Vinyl Record Butterflies
- Painted Polka Dot Piggy Bank
The post How to Use a Scorch Marker for Wood Burning Art appeared first on The Crafty Blog Stalker.


